How to Unlock your Phone if you Forgot Password or Pattern
How to Unlock your Phone if you Forgot Password or Pattern
You have an old phone and, terribly curious to see if it still works, you didn’t waste time turning it on. After a few seconds, however, here comes the bitter surprise: some time ago, you protected your smartphone with a password or PIN that, now, you no longer remember.
Wait a second, don’t give up yet! If you want to give a few minutes of your time to read this guide, I will explain to you, in detail, how to unlock your phone if you do not remember the password. Do not worry if you are not very familiar with technology, there is no reason: most of the methods that I am about to illustrate, do not require special technical skills and can also be put into practice by those who, like you, love to consider themselves a _technological clumsy_.
Index
Preliminary information

Before even getting to the heart of this guide and providing you with the information necessary to address the issue, I believe it is my duty to make you a very important premise: although unlocking a phone locked by a password is not an impossible task, it almost always requires a RESET of the phone.
Keep in mind that the reset procedure always involves the complete deletion of the data and settings saved in the device’s memory, be it an Android terminal or an iPhone. Consequently, unless you have taken steps to create a backup of the data, using the method most suitable for the type of smartphone in your possession, you may have to give up, forever, the information saved in it.
Furthermore, in the event that the data is saved on a microSD, make sure to remove it from the smartphone, before even starting one of the reset procedures illustrated in the following chapters of this guide.
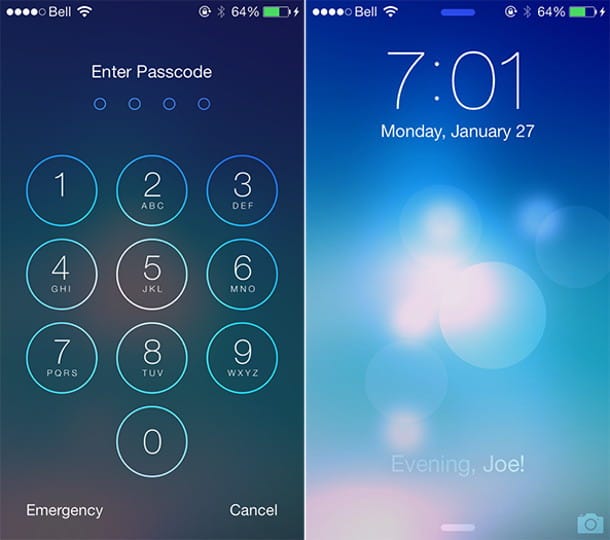
To conclude, I believe it is right to specify that the unlocking procedures allow you to delete, in addition to the phone password or its unlock code, also the pattern (ie the sequence to “draw” by joining the dots on the screen) and the information of authentication via fingerprint recognition (Touch ID on iPhone) and facial recognition (Face ID on iPhone).
Note: if it is not the real “lock code” that locks your phone, but the PIN or PUK codes of the SIM card inside it, know that you can unlock it quickly, simply by removing or replacing the SIM.
How to unlock your phone if you don’t remember the password
Have you fully understood everything I talked about in the previous chapter of this guide and, now, are you looking forward to understanding how to unlock your phone if you don’t remember the password, so you can start using it again as soon as possible?
Then do not wait any longer and read carefully the following sections of this tutorial, in which I will show you how to complete the procedure both on smartphones with Android and on iPhones.
Android
If the phone for which you have forgotten the password has an Android operating system, you can remedy the problem in two different ways: using Find my device, that is the “anti-theft” system made available by Google, designed for recovery and / or the restoration of lost or stolen devices, or using dr.Fone Unlock, that is a software independent from Android, able to perform a series of advanced operations on the system.
In both cases, however, you will need to remember the password of the Google account configured on the device, if any.
Find My Device
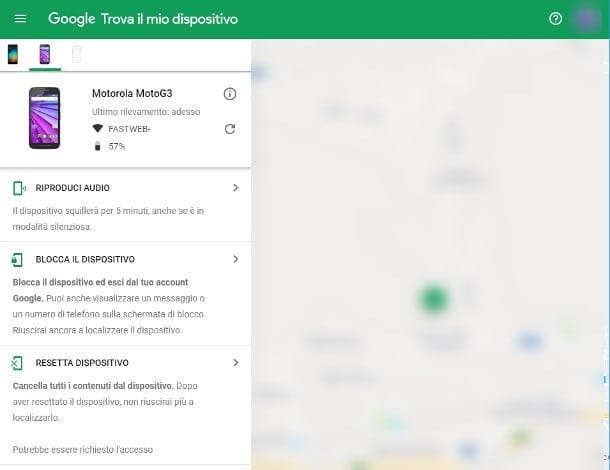
To unlock your phone using Find My Device, you will only need two tools: a browser and an Internet connection for the procedure to be implemented. For this to be successful, however, the Android device to be recovered must be turned on, connected to the Internet and enabled for management via the Google anti-theft system.
Generally, the activation of “Find my device”, unless otherwise indicated, occurs automatically during the first Android configuration phase. Alternatively, you can activate everything by going to the Settings menu> Google> Security> Find my Android device and moving the lever at the top of the screen to ON. proposal.
To grant action permissions (therefore the possibility of resetting or blocking the terminal), you must then go to the Settings> Security> Android device administrators menu and place the check mark next to Find my device.
In any case, if the necessary security measures are enabled, it is possible to reset the phone (thus also resetting the lock password) by following these steps: first of all, connect to the Internet page of Find my device and perform the log in using the Google account configured on the device to be restored.
Subsequently, select the phone to act on, using the icons shown on the top bar, then press the button> corresponding to the Reset device item and, bearing in mind that the operation will delete all the data in the phone, confirm the willingness to proceed , pressing the Reset Device button and re-entering the account password if prompted.
Once the reset procedure is completed (which will start as soon as the phone connects to the Internet), the previous lock password will be deleted, the phone will be reset to the factory state and it will be ready to face the initial configuration phase, during which you may be asked to enter the password of the Google account configured previously.
dr.Fone Unlock
Step 1. Connect your Android phone
Download dr.Fone for Android and install it on your Windows PC (it supports Windows 10, Windows 8, Windows 7 and Vista). Here is the main screen of dr.Fone:
Connect your Android phone to the PC using a USB cable and click on UNLOCK feature to start it.
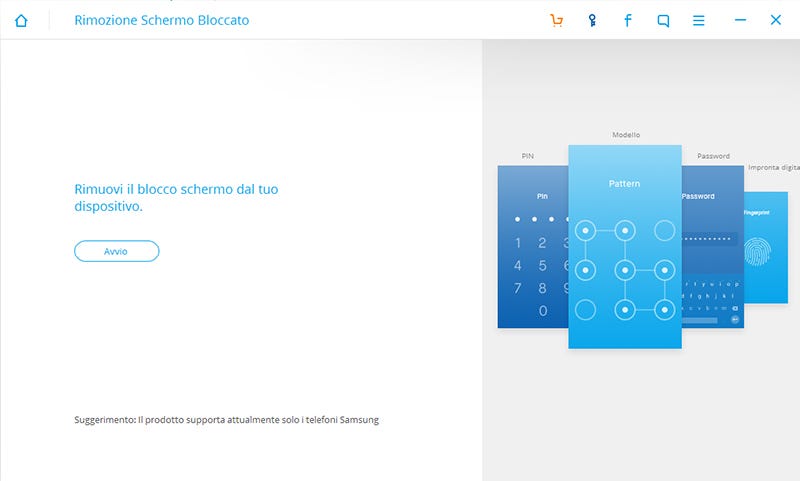
Step 2. Select device model
The software will ask you to select the exact model of your Android phone. At the moment only some Samsung phones are supported for this “unlock” feature
Step 3. Put the Android phone in Download Mode
Follow the instructions on the program to get the Android phone into Download Mode.
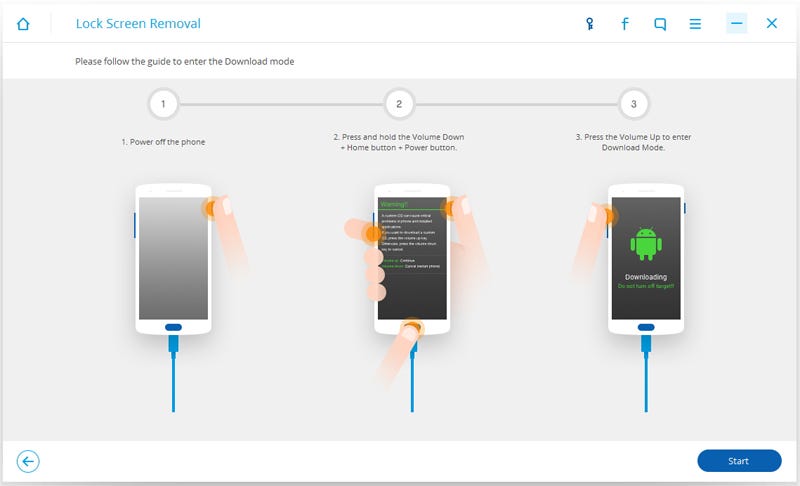
Step 4. Download recovery package
Once in download mode, the app will start downloading recovery package.
Step 5. Remove Andorid lock screen without password
When the recovery package downloading is completed, dr.fone will start to remove the screen lock.

Wait until on the screen you will read “Remove password completed”. Restart your phone and there will be no lock pattern or pin to enter.
iOS

Let me guess: you tried to unlock your iPhone by entering an incorrect unlock code multiple times, and after failing several times, you came face to face with the troubling message This iPhone is disabled, right?
Do not be afraid then, the device is not completely lost: you can recover it by carrying out a total reset of the same, an operation that also involves deleting the authentication system associated with the phone (be it the unlock code, the Touch ID or the Face ID ).
You can easily restore a disabled iPhone by using iTunes, Apple’s official program dedicated to managing iPhone, iPad and iPod via your computer. If you have a computer equipped with a Windows operating system, you can download and install iTunes using the steps I have explained to you in this guide; if, on the other hand, you have a Mac, you do not need to perform additional operations, as iTunes is present “standard” on macOS.
Keep in mind that, following the iPhone reset procedure, unless you have previously made a backup, you will lose all the data in the smartphone memory, as they will be deleted during the reset phase.
Moreover, at the first start of the phone, you will have to enter the password of the Apple ID configured in the “iPhone by” to be able to unlock the initial configuration. If you don’t remember it, you can easily recover it by following the instructions I gave you in my guide on how to recover your Apple ID password.
All clear? OK, so let’s get started right away. To fully restore the device, you need to bypass Apple’s “anti-theft” solution, Find My iPhone, which you cannot manually disable, as the device is locked. For this reason, you will have to restore after accessing DFU mode (or _device firmware upgrade_), an iOS “state” that allows you to intervene in a profound way on the operating system, overcoming both the bootloader and other restrictions. So, after connecting the iPhone to the computer using the supplied Lightning cable and opening iTunes, you can enter DFU mode by following the instructions provided below, which vary according to the device in your possession.
iPhone 8/8 Plus, iPhone X and later — with the phone on, quickly press the Volume +, Volume — and Power keys. Press and hold the latter until the screen goes black, and when this happens, release all the keys. Immediately after, press the Power and Volume buttons — together, for 5 seconds, release the Power button and continue to hold the Volume button — for another 5 seconds (or until iTunes displays the message about the presence of a device in recovery).
Exactly as I explained to you in my guide on how to put the iPhone in DFU, the login procedure is to be considered successful only if the phone screen remains black. If it turns on, it means that the iPhone is in recovery mode and not in DFU, so you have to do it all over again.
In any case, once you have successfully entered DFU mode, click on the OK button that appears on the iTunes screen and, to start restoring the device, click on the Restore iPhone and Restore / Restore and update buttons.
At the end of the reset procedure, the phone will restart automatically: for security reasons, you will be asked to enter the password of the Apple ID previously configured, in order to turn off the anti-theft function “Find my iPhone”.